Barnes and Noble Book of the Year: 2025
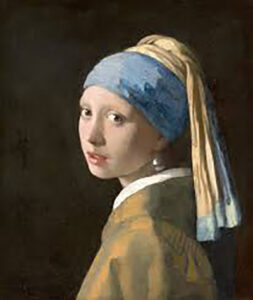
International book seller Barnes and Noble chose this book as its 2025 best seller, translated into 38 languages from the original by French art historian, Thomas Schlesser. He is a professor of art history at the Ecole Polytechnique in Paris, and this is his American debut with the work featured by Europa Editions in New York. He chose the image of a work of art by Johannes Vermeer from 1665 known as the Girl with the Pearl Earring which is in the Mauritshuis House in the Hague for his cover. The painting was donated there by Arnoldus Tombe in 1902 who had paid about 24 euros for same in 1881.
 Girl with a Pearl Earring, oil on canvas, 1665, Mauritshuis House.

Professor Schlesser has taken on a very unusual task with this novel which highlights 52 works of art and the story of a young girl, age 11, who wakes up one morning and cannot see. After medical exams and testing, her sight returns in a few days. Physicians cannot explain this blackout and insist that she see specialists in sight control and a psychiatrist to keep her calm and relaxed. Instead of a tedious weekly session with the latter, her grandfather steps in and says he will manage the situation. His plan is to take her each Wednesday to one of the three major museums in Paris for a detailed look and examination of a work of art. Mona loves this idea, and the book goes into detail on each of the 52 visits.
What is such fun is that the author divided the book into three sections with works of art from the Louvre in part one, the Museé D’Orsay in part two, and the Pompidou from the Beaubourg suburb in part three. These are very cleverly illustrated in the two-part cover of the book.
There is an expression in Spanish that reads: “Puede ver pero no puede mirar,” which translates that one can look but did not see enough. As museum statistics have claimed that the average visitor spends about 20 seconds in front of each work of art, I can relate that looking and seeing can be different experiences. With the details on each work of art, the grandfather tells Mona about the artist, his or her country, and the medium of the artwork. They then together stand in front of same for at least 20 minutes and talk about the image, its content, its meaning, its details and how they each think it became a very special work of art.
In part one Schlesser chose the Mona Lisa by Leonardo da Vinci as one of 19 works from the Louvre, and the grandfather explains that this was a private commission by a wealthy Florentine businessman, Francesco del Giocondo, who wanted to capture the smile of his lovely wife Lisa. In my art history classes, I learned that the Catholic church forbid women to be used in works of art in the 16th century unless they were to look like the Virgin Mary or her helpers. To engage also with the viewer in a direct pose was also considered sinful and most portraits were done in profile. The Mona Lisa thus became famous for her engaging smile and simple repose. Ironically Da Vinci never delivered the work of art and instead took it to France with him when he went to work for King Francis I who bought it from him in 1519. Subsequent kings had it in Versailles until it was moved to the Louvre where it is now under bullet proof glass where 80% of the visitors line up to see her.
 Leonardo da Vinci, Mona Lisa, 1519. Louvre Museum.

One more favorite in the second chapter of the book is the work of Paul Cezanne from 1890 called Montagne Sainte-Victoire, a view that he captured in oil from his studio window in Provence about 90 times. Cezanne’s father was a banker and not happy that his son chose to be an artist, but the famous French art dealer, Paul Durand Ruel, saved him by selling his work in his Paris gallery. Cezanne was quoted as saying that the mountain had a raging thirst for sunshine which he tried to capture in the details of the foreground, mid-level, and background. Mona said, “Grandpa I think Cezanne wanted to light up the world with his paintings.” (p. 256)
 Paul Cezanne, Montagne Sainte- Victoire, 1890. Museé D’Orsay.

In the third section Mona loves many of the works but identifies the work of Georgia O’Keeffe from 1924 as her favorite. Entitled Red, Yellow and Black Streaks, the grandfather says that O’Keeffe painted this one when she was living near Lake George in the Adirondack Mountains. He explained that her style became known as bio-morphism as she tried to turn nature into abstractions. Mona said, “Grandpa she has created a heaven of colors here with vapors and clouds moving all over the sky!” (p.335).
 Georgia O’Keeffe, Red, Yellow and Black Streaks, 1924. Centre Pompidou.

As the story ends Mona occasionally loses her sight again but when it returns, she relished the reminders of her 52 wonderful days with her grandfather looking at so many works of art. It is a complex ending to a wonderful book that captures the message that we need to both LOOK and SEE more in the wonderful world around us every day. Enjoy!
Source:
Thomas Schlesser, Mona’s Eyes. New York, Europa Editions, 2025.
The post Mona’s Eyes: A Novel by Thomas Schlesser – Reviewed by Sharon Lorenzo appeared first on Sharp Eye.